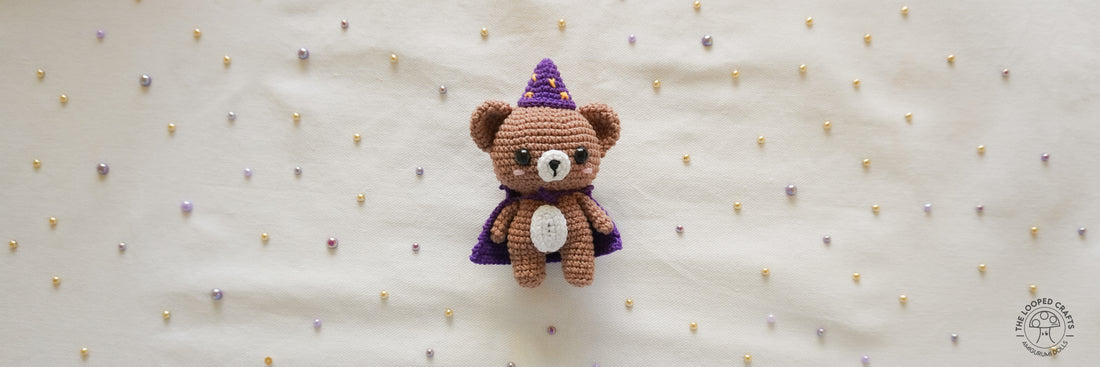
Introducing Popo the Great, a new free amigurumi pattern! This mini adorable bear wizard is sure to cast a spell on you with his charm and cuteness. This is again one of the first patterns that I created, and the best thing about him is that this is more beginner friend.y. So gather your crochet hooks and get ready to make your very own magical bear wizard! Make sure to email us a picture of your finished Popo for a chance to get featured here ✧
|
Materials: ✧ Yarn (Mercerized Cotton; ✧ 2mm hook ✧ 8 mm black safety eyes ✧ Needle for sewing ✧ Fabric Glue ✧ Fiber filling |
Abbreviations: ✧ R Round ✧ RW Row ✧ MR Magic Ring ✧ sc Single Crochet ✧ dc Double Crochet ✧ inc Increase ✧ dec Decrease ✧ BLO Back Loop Only ✧ st Stitch |
HEAD (use BROWN)
R1: 6 sc in MR (6)
R2: 6 inc (12)
R3: (sc, inc) x 6 (18)
R4: (2 sc, inc) x 6 (24)
R5: (3 sc, inc) x 6 (30)
R6: (4 sc, inc) x 6 (36)
R7: (5 sc, inc) x 6 (42)
R8: (6 sc, inc) x 6 (48)
R9-16: 48 sc (48)
R17: (2 sc, dec) x 12 (36)
R18: (sc, dec) x 12 (24)
R19: (2 sc, dec) x 6 (18)
Fasten off and leave long tail for sewing.
Secure eyes on R13-14 with 9st between.
FEET (use BROWN)-make 2
R1: 6 sc in MR (6)
R2: 6 inc (12)
R3: 12 sc in BLO (12)
R4-6: 12 sc (12)
Repat R1-6 for 2nd leg, but do not cut off yarn. We are now going to continue and make the body.
From 2nd leg, make 2 ch. Start on 1st st of 1st leg.
R7: (13 sc, inc) x 2 (30)
R8: (4 sc, dec) x 6 (36)
R9-11: 36 sc (36)
R12: (4 sc, dec) x 6 (30)
R13-15: 30 sc (30)
R16: (sc, dec) x 10 (20)
R17: (8 sc, dec) x 2 (18)
Fasten off and weave in end.
ARMS (use BROWN)- make 2
R1: 7 sc in MR (7)
R2-7: 7 sc (7)
Fasten off and leave long tail for sewing.
SNOUT (use WHITE)
R1: 6 sc in MR (6)
R2: 6 inc (12)
Fasten off and weave in end.
Sew the nose using some black embroidery thread. I’ve only used 3 strands of the thread.
BELLY (use white)
R1: 6 ch, start on 2nd ch from hook, 4 sc, inc, continue crocheting around the ch, 4 sc (10)
R2: continue crocheting around, 10 inc (20)
Fasten off and weave in end.
WIZARD HAT (use VIOLET)
R1: 6 sc in MR (6)
R2: (sc, inc) x 3 (9)
R3: (2 sc, inc) x 3 (12)
R4: (3 sc, inc) x 3 (15)
R5: (4 sc, inc) x 3 (18)
R6: (5 sc, inc) x 3 (21)
R7: (6 sc, inc) x 3 (24)
R8: (7 sc, inc) x 3 (27)
Fasten off and weave in end.
Get some yellow yarn and sew some small X on the hat to create the details.
RW1: 18 ch, start on 2nd ch from hook, 17 sc, turn (17)
RW2-3: 1 ch, skip ch, 17 sc, turn
RW4: 1 ch, skip ch, inc, 15 sc, inc,
turn (19)
RW4: 1 ch, skip ch, 19 sc, turn (19)
RW5: 1 ch, skip ch, inc, 17 sc, inc,
turn (21)
RW6: 1 ch, skip ch, 21 sc, turn (21)
RW7: 1 ch, skip ch, inc, 19 sc, inc,
turn (23)
RW8: 1 ch, skip ch, 23 sc, turn (23)
RW9: 1 ch, skip ch, inc, 21 sc, inc,
turn (25)
RW10: 1 ch, skip ch, 25 sc, turn (25)
RW11: 1 ch, skip ch, inc, 23 sc, inc,
turn (27)
RW12: 1 ch, skip ch, 27 sc, turn (27)
RW13: 1 ch, skip ch, inc, 25 sc, inc,
turn (29)
Fasten off and weave in end.
Cut two long strand of violet yarn and tie one end of each strand on each end of RW3 to serve as cord of the cape.
EARS (use BROWN)- make 2
R1: 6 sc in MR (6)
R2: 6 inc (12)
R3: (sc, inc) x 6 (18)
R4-6: 18 sc (18)
Fasten off and leave long tail for sewing.
- EARS: Sew ears on each side of the face at R6-12
- BLUSH: Get some pink yarn and sew blush just below the eyes
- SNOUT: Glue snout between the eyes.
- ARMS: Sew arms on R16
- BELLY: Glue belly in front of body.
- HEAD AND BODY: Using yarn tail of head, sew head and body together. Make sure that the head is properly aligned with the body.
- CAPE: Use the cords to tie the cape securely around the neck. Cut off excess cord.
- WIZARD HAT: Glue the rim of the hat on top of the head. You can also sew it.


1 comment
Row 8 of the Body is wrong: “R8: (4 sc, dec) x 6 (36)”. It should be “R8: (4 sc, inc) x 6 (36)”