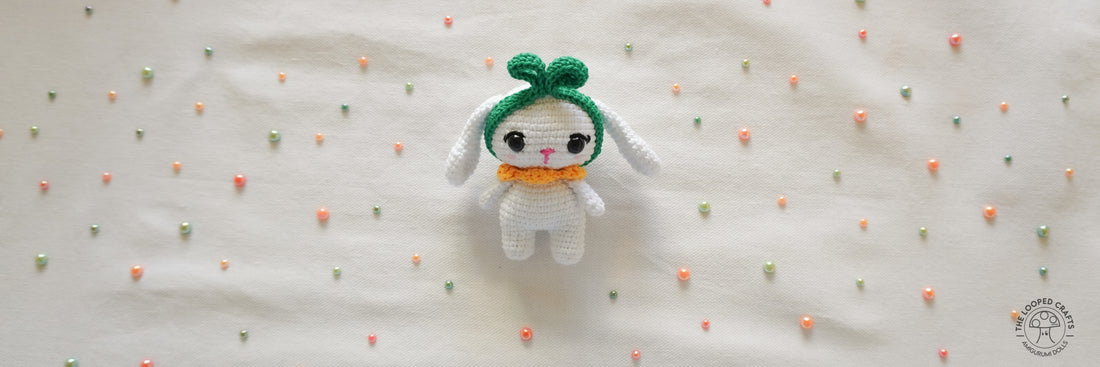
Say hello to Daffodil, a free mini amigurumi pattern! This is one of the first patterns that I've ever created when I was still in college, and I usually gave it as a gift to friends as a keychain. I hope that you'll enjoy crocheting this little rabbit, and if you have any questions, just leave a comment below or leave me a message. Happy crocheting!ꕥ
|
Materials: ꕥ Yarn (Mercerized Cotton; ꕥ 2mm hook ꕥ 8 mm black safety eyes ꕥ Needle for sewing ꕥ Fabric Glue ꕥ Fiber filling |
Abbreviations:
ꕥ R Round ꕥ RW Row ꕥ MR Magic Ring ꕥ sc Single Crochet ꕥ dc Double Crochet ꕥ inc Increase ꕥ dec Decrease ꕥ BLO Back Loop Only ꕥ st Stitch |
HEAD (use WHITE)
R1: 6 sc in MR (6)
R2: 6 inc (12)
R3: (sc, inc) x 6 (18)
R4: (2 sc, inc) x 6 (24)
R5: (3 sc, inc) x 6 (30)
R6: (4 sc, inc) x 6 (36)
R7: (5 sc, inc) x 6 (42)
R8: (6 sc, inc) x 6 (48)
R9-16: 48 sc (48)
R17: (2 sc, dec) x 12 (36)
R18: (sc, dec) x 12 (24)
R19: (2 sc, dec) x 6 (18)
Fasten off and leave long tail for sewing.
Secure eyes on R13-14 with 9st between.
FEET (use BROWN)-make 2
R1: 6 sc in MR (6)
R2: 6 inc (12)
R3: 12 sc in BLO (12)
R4-6: 12 sc (12)
Repat R1-6 for 2nd leg, but do not cut off yarn. We are now going to continue and make the body.
From 2nd leg, make 2 ch. Start on 1st st of 1st leg.
R7: (13 sc, inc) x 2 (30)
R8: (4 sc, dec) x 6 (36)
R9-11: 36 sc (36)
R12: (4 sc, dec) x 6 (30)
R13-15: 30 sc (30)
R16: (sc, dec) x 10 (20)
R17: (8 sc, dec) x 2 (18)
Fasten off and weave in end.
ARMS (use WHITE)- make 2
R1: 7 sc in MR (7)
R2-7: 7 sc (7)
Fasten off and leave long tail for sewing.
EARS (use WHITE)- make 2
R1: 6 sc in MR (6)
R2: 6 inc (12)
R3: (sc, inc) x 6 (18)
R4-7: 18 sc (18)
R8: (sc, dec) x 6 (12)
R9-16: 12 sc (12)
Fasten off and leave long tail for sewing.
COLLAR (use YELLOW)
RW1: 21 ch, start on 2nd ch from hook, 20 sc, turn
RW2: 1 ch, skip ch, (sc, 2 dc on 1 st, 2 dc on 1 st, sc) x 5
Fasten off and weave in end.
HEADBAND (use GREEN)
RW1: 81 ch, start on 2nd ch from hook, 80 sc, turn
RW2-3: 1 ch, skip ch, 80 sc, turn
Fasten off and weave in end.
- EARS: Sew ears on each side of the face at R8
- BLUSH: Get some light pink yarn and sew blush just below the eyes
- SNOUT: Get some dark pink yarn and sew snout
- ARMS: Sew arms on R16
- HEAD AND BODY: Using yarn tail of head, sew head and body together. Make sure that the head is properly aligned with the body.
- COLLAR: Wrap collar around the neck, and sew ends together to connect them and secure
- HEADBAND: Fold ends and glue tips to create the loops. Wrap the headband around the head, and secure using some glue. Style the headband like what is shown in the picture


1 comment
xsjput